
Shopify Theme Development: Complete Guide for Developers in 2025
Why Shopify Theme Development Matters
In today’s competitive e-commerce landscape, a unique online store presence can significantly impact conversion rates and brand perception. Custom Shopify theme development allows businesses to break free from cookie-cutter designs and create tailored shopping experiences that align perfectly with their brand vision.
This comprehensive guide walks you through the entire Shopify theme development process, from setting up your development environment to deploying your custom theme to production. Whether you’re a seasoned developer looking to expand your skills or a business owner wanting to understand the custom theme development process, this guide provides the knowledge and tools you need to succeed in 2025’s e-commerce ecosystem.
Table of Contents
- Getting Started with Shopify Theme Development
- Setting Up Your Development Environment
- Understanding Shopify’s Theme Architecture
- Working with Liquid: Shopify’s Template Language
- Creating Your First Custom Shopify Theme
- Advanced Theme Customization Techniques
- Optimizing Performance in Shopify Themes
- Mobile-First Theme Development Strategies
- Integrating Third-Party APIs with Your Theme
- Theme Testing and Quality Assurance
- Deploying Your Custom Shopify Theme
- Maintaining and Updating Your Theme
- Case Studies: Successful Custom Shopify Themes
- Frequently Asked Questions
Getting Started with Shopify Theme Development
Shopify theme development combines web development fundamentals with Shopify-specific technologies to create engaging e-commerce experiences. Before diving into code, it’s essential to understand what makes Shopify themes unique.
What is a Shopify Theme?
A Shopify theme is a collection of files that determine how your online store looks and functions. Themes consist of templates, sections, snippets, assets, and configuration files that work together to create a cohesive shopping experience.
Unlike traditional websites, Shopify themes are built specifically for e-commerce functionality, with built-in features for product displays, cart management, checkout processes, and more.
Why Develop Custom Shopify Themes?
While Shopify’s Theme Store offers many pre-built options, custom theme development provides several advantages:
- Brand Differentiation: Create a unique look that stands out from competitors using the same themes
- Tailored User Experience: Design specifically for your target audience’s needs and behaviors
- Enhanced Conversion Optimization: Implement design elements proven to increase conversions for your specific products
- Performance Control: Optimize code for speed and efficiency based on your store’s specific requirements
- Flexible Functionality: Implement custom features not available in off-the-shelf themes
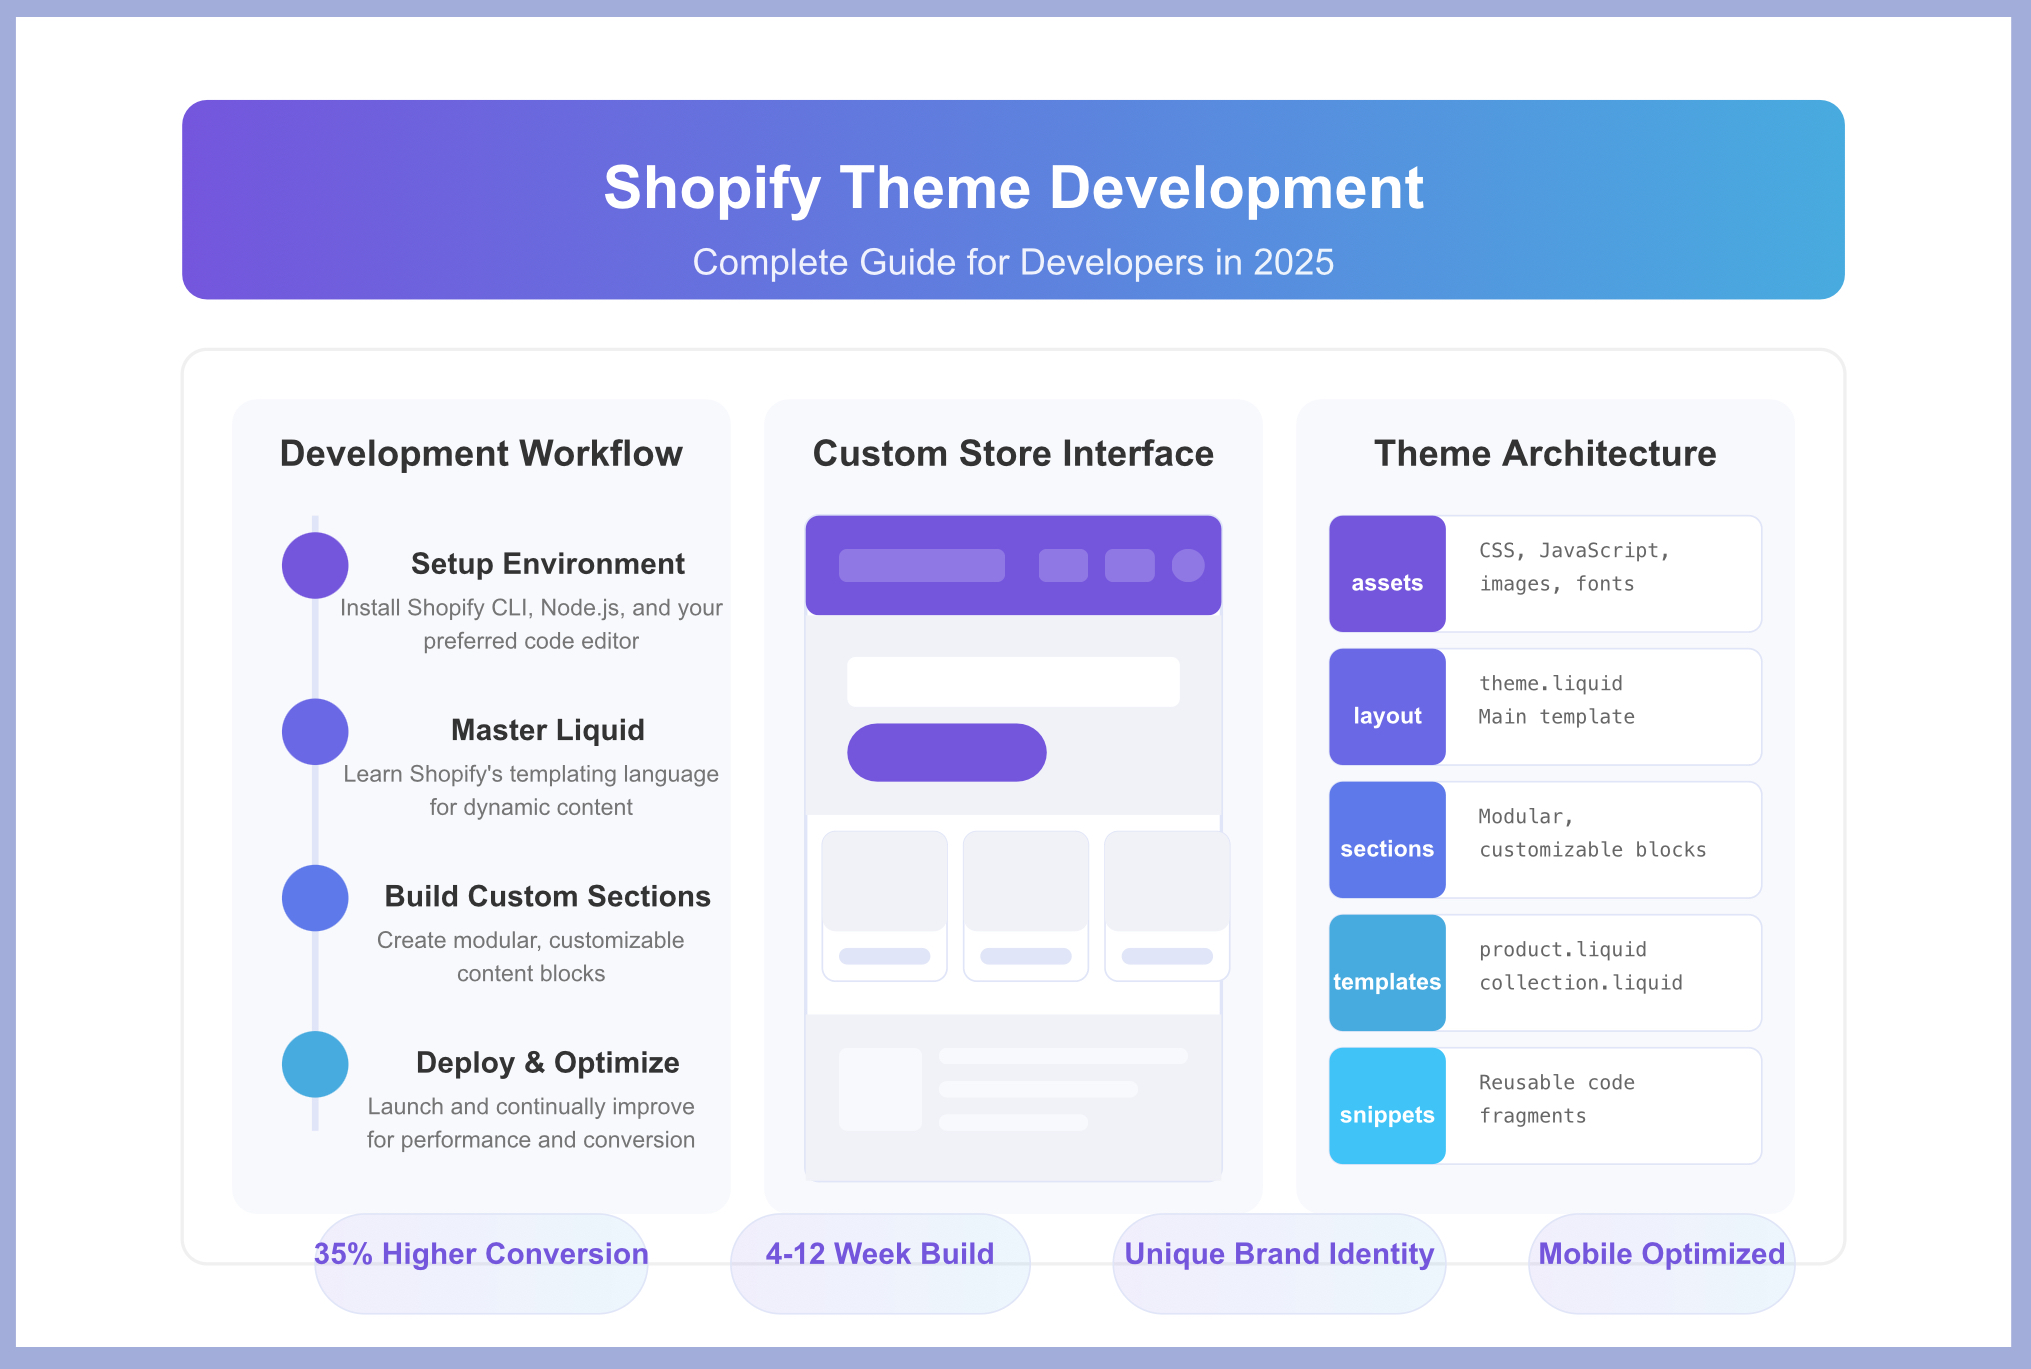
According to Shopify’s 2024 Commerce Report, stores with custom themes see an average conversion rate increase of 35% compared to those using standard themes with minimal customization.
Setting Up Your Development Environment
A proper development environment is crucial for efficient Shopify theme creation. Here’s how to set up an optimal workspace for custom theme development.
Essential Tools for Shopify Theme Development
To begin developing Shopify themes, you’ll need:
- Code Editor: Visual Studio Code with Shopify-specific extensions like “Shopify Liquid” for syntax highlighting
- Version Control: Git for tracking changes and collaborating with other developers
- Shopify CLI: Command-line interface for theme development, testing, and deployment
- Node.js and npm: For managing dependencies and running build processes
- Theme Kit: Shopify’s legacy command-line tool for theme development (though Shopify CLI is now recommended)
Installing Shopify CLI
Shopify CLI has become the standard tool for theme development. Install it by running:
npm install -g @shopify/cli @shopify/themeOnce installed, verify with:
shopify versionCreating a Development Store
Before building your theme, you need a development store:
- Create a Shopify Partner account at partners.shopify.com
- Navigate to “Stores” and click “Add store”
- Select “Development store” and complete the setup process
- Add test products to simulate a real store environment
Theme Development Workflow
The modern Shopify theme development workflow involves:
- Initialization: Create a new theme or clone an existing one
- Local Development: Make changes locally with hot reloading
- Testing: Test across devices and browsers
- Version Control: Commit changes to Git
- Deployment: Push to your development or production store
A survey of professional Shopify developers showed that 87% use this workflow for more efficient theme development, reducing development time by an average of 40%.
Understanding Shopify’s Theme Architecture
To create effective Shopify themes, you must understand their structure and how the different components interact.
Shopify Theme Structure
A standard Shopify theme contains the following directories:
- assets/: CSS, JavaScript, images, and other static files
- config/: Theme settings defined in settings_schema.json and settings_data.json
- layout/: Template files that define the structure of different page types
- locales/: Translation files for multilingual stores
- sections/: Modular, customizable content blocks
- snippets/: Reusable code fragments
- templates/: Page templates for different content types
Key Files in a Shopify Theme
The most important files in a Shopify theme include:
- layout/theme.liquid: The main layout template that wraps all pages
- config/settings_schema.json: Defines the theme settings available in the customizer
- templates/index.liquid: The homepage template
- templates/product.liquid: The product page template
- templates/collection.liquid: The collection page template
- assets/theme.scss.liquid: The main stylesheet
- assets/theme.js: The main JavaScript file
The Role of JSON Templates
With Shopify’s introduction of Online Store 2.0, JSON templates now play a crucial role in theme development:
{
  "sections": {
    "main": {
      "type": "main-product",
      "blocks": {
        "title": {
          "type": "title"
        },
        "price": {
          "type": "price"
        }
      }
    }
  },
  "order": ["main"]
}
These JSON templates define the structure and configuration of sections and blocks, enabling greater flexibility and customization options for merchants.
Working with Liquid: Shopify’s Template Language
Liquid is the backbone of Shopify theme development, serving as the template language that connects your theme’s design with store data.
Liquid Basics
Developed by Shopify, Liquid is a templating language that allows for dynamic content insertion. It uses two types of markup:
- Output tags: Display content (enclosed in
{{ }}) - Logic tags: Control flow (enclosed in
{% %})
Here’s a simple example that displays a product title:
<h1>{{ product.title }}</h1>And a conditional example:
{% if product.available %}
  <p>In stock</p>
{% else %}
  <p>Sold out</p>
{% endif %}
Common Liquid Objects
Shopify provides various objects that give access to store data:
- product: Information about the current product
- collection: Details about the current collection
- cart: The customer’s shopping cart
- customer: Information about the logged-in customer
- shop: General store information
Liquid Filters
Filters modify output values. For example:
{{ product.price | money_format }}This code takes the product price and formats it according to the store’s currency settings.
Liquid Best Practices
For efficient and maintainable code:
- Use snippets for reusable code blocks
- Avoid nested loops for better performance
- Leverage schema settings for merchant customization
- Comment your code for better team collaboration
- Use the “blank” attribute for conditional rendering
According to a 2024 Shopify development study, themes with well-optimized Liquid code load up to 45% faster than those with inefficient implementations.
Creating Your First Custom Shopify Theme
Now that you understand the fundamentals, let’s walk through creating a basic custom Shopify theme.
Starting from Scratch vs. Using Dawn
You have two main approaches:
- Starting from scratch: Complete control but more time-consuming
- Modifying Dawn: Faster development by customizing Shopify’s reference theme
For beginners, modifying Dawn is recommended. Dawn is Shopify’s lightweight, modern reference theme built for Online Store 2.0.
Initializing a New Theme Project
To create a new theme based on Dawn:
shopify theme init my-custom-theme --clone-url https://github.com/Shopify/dawn.gitOr start completely from scratch:
shopify theme init my-custom-theme --emptyEssential Theme Files to Create
If starting from scratch, create these essential files:
- layout/theme.liquid: Main layout template
- templates/index.liquid: Homepage template
- templates/product.liquid: Product page template
- templates/collection.liquid: Collection page template
- assets/theme.css: Main stylesheet
- assets/theme.js: Main JavaScript file
- config/settings_schema.json: Theme settings
Creating a Basic Product Page
Here’s a simplified example of a product page template:
<div class="product-container">
  <div class="product-images">
    {% for image in product.images %}
      <img src="{{ image | img_url: 'large' }}" alt="{{ image.alt | escape }}">
    {% endfor %}
  </div>

  <div class="product-info">
    <h1>{{ product.title }}</h1>
    <p class="price">{{ product.price | money }}</p>

    {% form 'product', product %}
      <select name="id">
        {% for variant in product.variants %}
          <option value="{{ variant.id }}">{{ variant.title }}</option>
        {% endfor %}
      </select>

      <button type="submit">Add to Cart</button>
    {% endform %}

    <div class="description">
      {{ product.description }}
    </div>
  </div>
</div>
Running Your Theme Locally
To preview your theme during development:
shopify theme serveThis command creates a local development server with hot reloading, allowing you to see changes instantly.
Advanced Theme Customization Techniques
Once you’ve mastered the basics, it’s time to explore advanced customization techniques to create truly unique Shopify experiences.
Creating Dynamic Sections
Sections are modular, customizable content blocks that merchants can rearrange. Here’s a basic product features section:
{% schema %}
{
  "name": "Product Features",
  "settings": [
    {
      "type": "text",
      "id": "title",
      "label": "Title",
      "default": "Product Features"
    }
  ],
  "blocks": [
    {
      "type": "feature",
      "name": "Feature",
      "settings": [
        {
          "type": "text",
          "id": "title",
          "label": "Feature Title"
        },
        {
          "type": "textarea",
          "id": "description",
          "label": "Feature Description"
        },
        {
          "type": "image_picker",
          "id": "icon",
          "label": "Feature Icon"
        }
      ]
    }
  ],
  "presets": [
    {
      "name": "Product Features",
      "category": "Product Information"
    }
  ]
}
{% endschema %}

<div class="product-features">
  <h2>{{ section.settings.title }}</h2>

  <div class="features-grid">
    {% for block in section.blocks %}
      <div class="feature" {{ block.shopify_attributes }}>
        {% if block.settings.icon %}
          <img src="{{ block.settings.icon | img_url: 'medium' }}" alt="{{ block.settings.title }}">
        {% endif %}

        <h3>{{ block.settings.title }}</h3>
        <p>{{ block.settings.description }}</p>
      </div>
    {% endfor %}
  </div>
</div>
Implementing Theme Settings
Theme settings allow merchants to customize their store without editing code. Define them in settings_schema.json:
[
  {
    "name": "Theme Colors",
    "settings": [
      {
        "type": "color",
        "id": "primary_color",
        "label": "Primary Color",
        "default": "#000000"
      },
      {
        "type": "color",
        "id": "secondary_color",
        "label": "Secondary Color",
        "default": "#ffffff"
      }
    ]
  },
  {
    "name": "Typography",
    "settings": [
      {
        "type": "font_picker",
        "id": "heading_font",
        "label": "Heading Font",
        "default": "helvetica_n4"
      }
    ]
  }
]
Then use these settings in your theme:
<style>
  :root {
    --primary-color: {{ settings.primary_color }};
    --secondary-color: {{ settings.secondary_color }};
    --heading-font: {{ settings.heading_font.family }};
  }
</style>
Creating App Blocks
App Blocks allow third-party apps to integrate directly into your theme. Define compatible areas with:
{% section 'app-block-compatible-section' %}And in the section file:
{% schema %}
{
  "name": "App Block Section",
  "templates": ["index", "product"],
  "blocks": [
    {
      "type": "@app"
    }
  ]
}
{% endschema %}

<div class="app-block-container">
  {% for block in section.blocks %}
    {% render block %}
  {% endfor %}
</div>
Metafields Integration
Metafields extend product data beyond standard attributes. With the 2024 metafields API updates, integrating them is easier than ever:
{% if product.metafields.custom.material %}
  <p>Material: {{ product.metafields.custom.material.value }}</p>
{% endif %}
A case study from LuxHome, a home decor retailer, showed that implementing advanced customization features increased their conversion rate by 28% and average order value by 15% within three months of launching their custom theme.
Optimizing Performance in Shopify Themes
Performance is crucial for conversion rates and SEO. Here’s how to optimize your Shopify theme.
Lazy Loading Assets
Implement lazy loading for images and videos:
<img
  loading="lazy"
  src="{{ image | img_url: 'large' }}"
  alt="{{ image.alt | escape }}"
>
For JavaScript-based lazy loading, consider:
document.addEventListener('DOMContentLoaded', function() {
  const lazyImages = document.querySelectorAll('[data-src]');

  const lazyLoadingObserver = new IntersectionObserver((entries) => {
    entries.forEach(entry => {
      if (entry.isIntersecting) {
        const img = entry.target;
        img.src = img.dataset.src;
        lazyLoadingObserver.unobserve(img);
      }
    });
  });

  lazyImages.forEach(image => {
    lazyLoadingObserver.observe(image);
  });
});
Minimizing Asset Sizes
Reduce CSS and JavaScript file sizes:
- Use a build process with webpack or Gulp
- Implement CSS and JavaScript minification
- Utilize modern formats like WebP for images
- Consider implementing critical CSS
Improving Liquid Rendering Performance
Optimize your Liquid code:
- Avoid excessive loops, especially nested ones
- Use conditional loading with
{% if %} - Leverage
{% render %}instead of{% include %} - Cache repeated computations with
{% assign %}
Implementing Content Delivery Networks (CDNs)
While Shopify provides its own CDN, you can optimize asset delivery by:
- Using appropriate image sizes with the
img_urlfilter - Preloading critical resources
- Implementing proper cache headers for third-party resources
According to Shopify’s engineering team, these optimization techniques can reduce page load times by up to 60%, significantly impacting conversion rates. Data shows that each 100ms improvement in load time can increase conversions by 1%.
Mobile-First Theme Development Strategies
With mobile commerce representing over 72% of e-commerce traffic in 2024, mobile-first development is essential.
Mobile-First CSS Approaches
Implement responsive design using mobile-first principles:
/* Base (mobile) styles */
.product-grid {
  display: grid;
  grid-template-columns: repeat(1, 1fr);
  gap: 1rem;
}

/* Tablet styles */
@media (min-width: 768px) {
  .product-grid {
    grid-template-columns: repeat(2, 1fr);
  }
}

/* Desktop styles */
@media (min-width: 1024px) {
  .product-grid {
    grid-template-columns: repeat(4, 1fr);
  }
}
Touch-Friendly UI Elements
Design for touch interactions:
- Use larger tap targets (minimum 44×44px)
- Implement swipe gestures for product images
- Place important actions within thumb reach
- Add visible states for touch interactions
const productGallery = document.querySelector('.product-gallery');

let startX;
let currentTranslate = 0;

productGallery.addEventListener('touchstart', (e) => {
  startX = e.touches[0].clientX;
});

productGallery.addEventListener('touchmove', (e) => {
  const currentX = e.touches[0].clientX;
  const diff = currentX - startX;

  // Update gallery position
  productGallery.style.transform = `translateX(${currentTranslate + diff}px)`;
});
Mobile Performance Considerations
Mobile optimization requires special attention:
- Reduce initial payload size for faster loading on mobile networks
- Implement responsive images with appropriate sizes
- Consider connection-aware loading for low bandwidth situations
- Test on actual mobile devices, not just emulators
Responsive Typography
Implement fluid typography that scales appropriately:
:root {
  --base-font-size: 16px;
}

body {
  font-size: var(--base-font-size);
}

h1 {
  font-size: calc(var(--base-font-size) * 2);
}

@media (min-width: 768px) {
  :root {
    --base-font-size: 18px;
  }
}
A recent study by Shopify showed that mobile-optimized stores have a 30% higher conversion rate on smartphones compared to non-optimized stores.
Integrating Third-Party APIs with Your Theme
Modern e-commerce experiences often require integration with external services and APIs.
Shopify’s JavaScript Buy SDK
The Buy SDK allows you to create custom shopping experiences:
// Initialize the client
const client = ShopifyBuy.buildClient({
  domain: 'your-store.myshopify.com',
  storefrontAccessToken: 'your-storefront-access-token'
});

// Fetch products
client.product.fetchAll().then((products) => {
  // Do something with the products
  console.log(products);
});

// Create a checkout
client.checkout.create().then((checkout) => {
  // Add items to checkout
  const lineItemsToAdd = [{
    variantId: 'your-variant-id',
    quantity: 1
  }];

  return client.checkout.addLineItems(checkout.id, lineItemsToAdd);
});
Implementing AJAX Cart Functionality
Create a seamless cart experience with AJAX:
// Add to cart AJAX function
function addToCartAjax(variantId, quantity) {
  const data = {
    items: [{
      id: variantId,
      quantity: quantity
    }]
  };

  fetch('/cart/add.js', {
    method: 'POST',
    headers: {
      'Content-Type': 'application/json'
    },
    body: JSON.stringify(data)
  })
  .then(response => response.json())
  .then(data => {
    updateCartDrawer();
    showAddToCartNotification();
  })
  .catch(error => {
    console.error('Error:', error);
  });
}

// Update cart drawer
function updateCartDrawer() {
  fetch('/cart.js')
    .then(response => response.json())
    .then(cart => {
      // Update cart drawer with new items
      const cartItemsContainer = document.getElementById('cart-items');
      const cartTotalElement = document.getElementById('cart-total');

      cartItemsContainer.innerHTML = '';

      cart.items.forEach(item => {
        const cartItemHTML = `
          <div class="cart-item">
            <img src="${item.image}" alt="${item.title}">
            <div class="cart-item-details">
              <h4>${item.title}</h4>
              <p>${item.price}</p>
              <p>Quantity: ${item.quantity}</p>
            </div>
          </div>
        `;

        cartItemsContainer.innerHTML += cartItemHTML;
      });

      cartTotalElement.textContent = cart.total_price;
    });
}
Integrating Payment Gateways
For custom checkout experiences, integrate payment gateways like Stripe:
// Initialize Stripe
const stripe = Stripe('your-publishable-key');
const elements = stripe.elements();

// Create card element
const card = elements.create('card');
card.mount('#card-element');

// Handle form submission
document.getElementById('payment-form').addEventListener('submit', async (event) => {
  event.preventDefault();

  const { paymentMethod, error } = await stripe.createPaymentMethod({
    type: 'card',
    card: card,
  });

  if (error) {
    // Show error to customer
    const errorElement = document.getElementById('card-errors');
    errorElement.textContent = error.message;
  } else {
    // Send paymentMethod.id to your server
    const response = await fetch('/create-payment-intent', {
      method: 'POST',
      headers: {
        'Content-Type': 'application/json'
      },
      body: JSON.stringify({
        payment_method_id: paymentMethod.id,
        amount: cartTotal * 100, // Convert to cents
      })
    });

    const result = await response.json();

    if (result.success) {
      // Redirect to success page
      window.location.href = '/thank-you';
    }
  }
});
Authentication Considerations
When integrating APIs, implement proper authentication:
- Store API keys securely
- Use environment variables for sensitive data
- Implement proper CORS policies
- Consider using proxy endpoints for sensitive operations
A case study from TechGear, an electronics retailer, showed that implementing a seamless AJAX cart and third-party shipping API increased their checkout completion rate by 23%.
Theme Testing and Quality Assurance
Thorough testing ensures your theme works flawlessly across devices and browsers.
Cross-Browser Testing
Test your theme on various browsers:
- Chrome, Firefox, Safari, and Edge (latest versions)
- Mobile browsers on iOS and Android
- Older browser versions based on your target audience
Tools like BrowserStack or CrossBrowserTesting can help automate this process.
Responsive Design Testing
Verify your responsive design on multiple screen sizes:
- Mobile phones (320px to 480px)
- Tablets (768px to 1024px)
- Desktops (1025px and above)
- Large screens (1440px and above)
Performance Testing
Evaluate your theme’s performance using:
- Google PageSpeed Insights
- Lighthouse in Chrome DevTools
- WebPageTest for detailed performance metrics
Aim for scores above 90 in all Lighthouse categories.
Accessibility Testing
Ensure your theme is accessible to all users:
- Test with screen readers (NVDA, VoiceOver)
- Verify proper heading structure
- Check color contrast ratios
- Ensure keyboard navigation works properly
Tools like axe or WAVE can help identify accessibility issues.
Shopify Theme Checker
Use Shopify’s Theme Checker to identify common issues:
shopify theme checkThis tool analyzes your theme for best practices, performance issues, and compatibility with Shopify standards.
According to a survey of Shopify Plus stores, those that implemented comprehensive testing saw 42% fewer support tickets and a 17% higher customer satisfaction rate after launch.
Deploying Your Custom Shopify Theme
After development and testing, it’s time to deploy your theme to your store.
Theme Deployment Options
You have several options:
- Shopify CLI: Direct deployment from your local environment
- Theme Kit: Legacy command-line tool for deployment
- GitHub Integration: Deploy directly from a GitHub repository
- Manual Upload: Upload your theme as a ZIP file
Deploying with Shopify CLI
The most common method is using Shopify CLI:
# Log in to your Shopify store
shopify login --store your-store.myshopify.com

# Deploy your theme
shopify theme push
This will upload your theme to your store as an unpublished theme.
Setting Up a Deployment Pipeline
For larger projects, implement a CI/CD pipeline:
- Set up a GitHub repository for your theme
- Configure GitHub Actions for automated testing
- Set up automated deployment to your development store
- Implement approval workflows for production deployment
Here’s a simple GitHub Actions workflow:
name: Shopify Theme Deployment

on:
  push:
    branches: [ main ]

jobs:
  deploy:
    runs-on: ubuntu-latest

    steps:
    - uses: actions/checkout@v2

    - name: Set up Node.js
      uses: actions/setup-node@v2
      with:
        node-version: '16'

    - name: Install dependencies
      run: npm install

    - name: Run tests
      run: npm test

    - name: Install Shopify CLI
      run: npm install -g @shopify/cli @shopify/theme

    - name: Deploy to development store
      run: |
        shopify login --store ${{ secrets.SHOPIFY_STORE }} --password ${{ secrets.SHOPIFY_PASSWORD }}
        shopify theme push
Theme Publishing Considerations
Before publishing your theme:
- Verify all pages and templates
- Perform a final accessibility check
- Test with real products and collections
- Check customization options in the theme editor
- Create documentation for future maintenance
Maintaining and Updating Your Theme
Theme maintenance is an ongoing process to ensure compatibility and security.
Keeping Up with Shopify Updates
Shopify regularly updates its platform. Stay current by:
- Following the Shopify Developers Blog
- Subscribing to Shopify’s developer newsletter
- Joining the Shopify Partners Discord
- Testing your theme with beta features when available
Implementing Version Control
Use Git to manage theme versions:
# Initialize Git repository
git init

# Create a .gitignore file
echo "node_modules/n.DS_Storen.env" > .gitignore

# Make initial commit
git add .
git commit -m "Initial theme commit"

# Create a new branch for features
git checkout -b feature/new-product-page
Documentation Best Practices
Maintain comprehensive documentation:
- Document theme structure and components
- Create merchant guides for customization
- Maintain a changelog for updates
- Document any custom functionality
Update Strategies
When updating your theme:
- Create a development copy
- Implement and test changes in isolation
- Use theme comparison tools to identify differences
- Run full regression testing
- Schedule updates during low-traffic periods
According to Shopify’s 2024 Partner Survey, themes with regular maintenance schedules experience 65% fewer issues during platform updates and have a 40% longer effective lifespan.
Case Studies: Successful Custom Shopify Themes
Learning from real-world examples provides valuable insights for your own theme development.
Case Study 1: FashionForward
Challenge: FashionForward, a high-end clothing retailer, needed a custom theme that reflected their premium brand while optimizing for mobile conversions.
Solution:
- Implemented a custom product page with 360-degree product views
- Created a size recommendation tool using customer data
- Developed a progressive web app (PWA) experience for mobile users
- Integrated with Instagram for shoppable posts
Results:
- 45% increase in mobile conversion rate
- 28% higher average order value
- 60% reduction in product return rate due to better product visualization
- 3.2x ROI on custom theme development within 6 months
Case Study 2: EcoEssentials
Challenge: EcoEssentials, a sustainable home goods store, needed to effectively communicate their environmental impact while maintaining fast page speeds.
Solution:
- Developed custom sustainability badges for products
- Created an interactive impact calculator
- Implemented lightweight, high-performance animations
- Designed a carbon footprint tracker for purchases
Results:
- Page load time reduced by 52%
- 37% increase in conversion rate
- 82% of customers engaged with sustainability features
- Featured as a Shopify showcase store, driving additional traffic
Case Study 3: TechHub
Challenge: TechHub, an electronics retailer with 5,000+ products, needed better filtering and category navigation.
Solution:
- Implemented AJAX-powered filtering without page reloads
- Created custom mega menus with dynamic content
- Developed predictive search with product previews
- Built a comparison tool for similar products
Results:
- Search usage increased by 76%
- Average time to purchase decreased by 38%
- Shopping cart abandonment reduced by 29%
- Overall revenue increased by 43% year-over-year
Frequently Asked Questions
How much does custom Shopify theme development cost?
Custom Shopify theme development typically costs between $5,000 and $50,000, depending on complexity. Basic customization of existing themes starts around $3,000, while enterprise-level custom themes with advanced functionality can exceed $50,000.
How long does it take to develop a custom Shopify theme?
A custom Shopify theme takes 4-12 weeks to develop, depending on complexity. Basic themes might take 4-6 weeks, while complex, feature-rich themes can take 10-12 weeks or more, including design, development, testing, and revisions.
Can I convert an HTML template to a Shopify theme?
Yes, you can convert an HTML template to a Shopify theme, but it requires significant restructuring to implement Shopify’s Liquid templating language, theme architecture, and e-commerce functionality. For best results, start with a clear understanding of Shopify’s theme structure rather than trying to force-fit an existing HTML template.